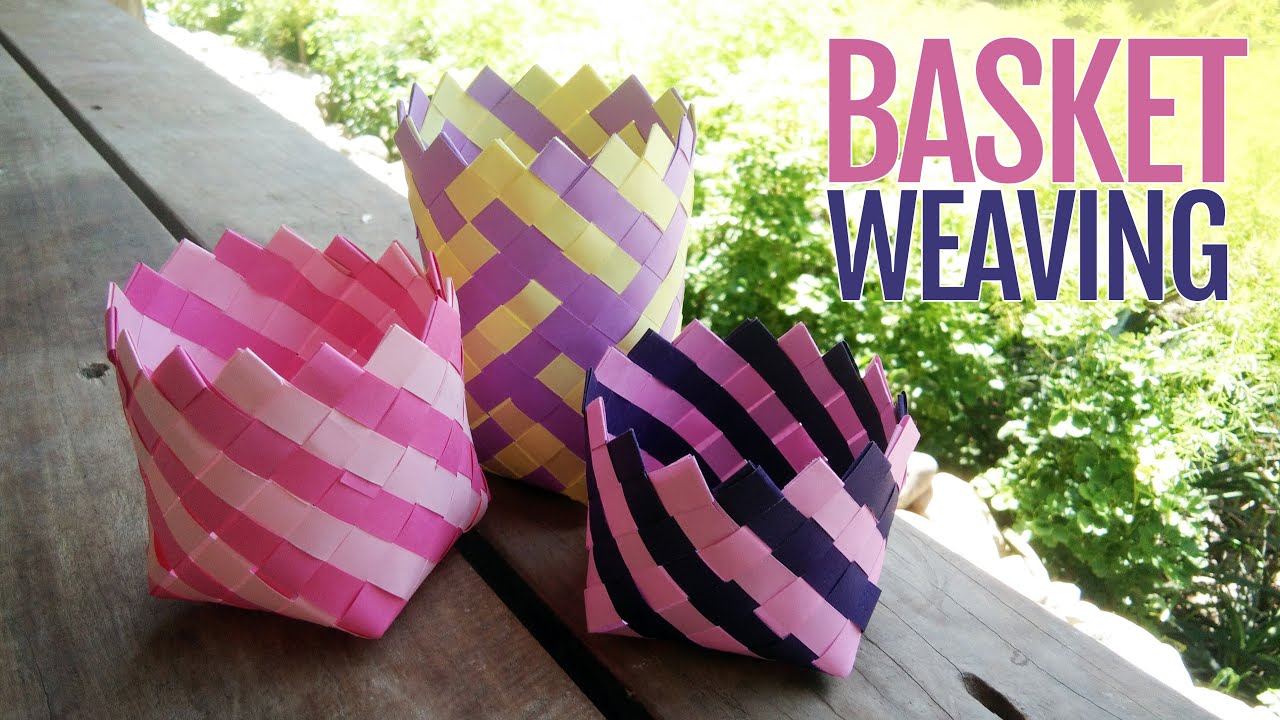
How to weave a basket with paper? Follow Weaving.top to discover this trick today! Paper weaving is a craft that has been around for centuries, with its origins dating back to ancient civilizations. It involves the interlacing of strips of paper to create beautiful and functional objects such as baskets, mats, and even furniture.
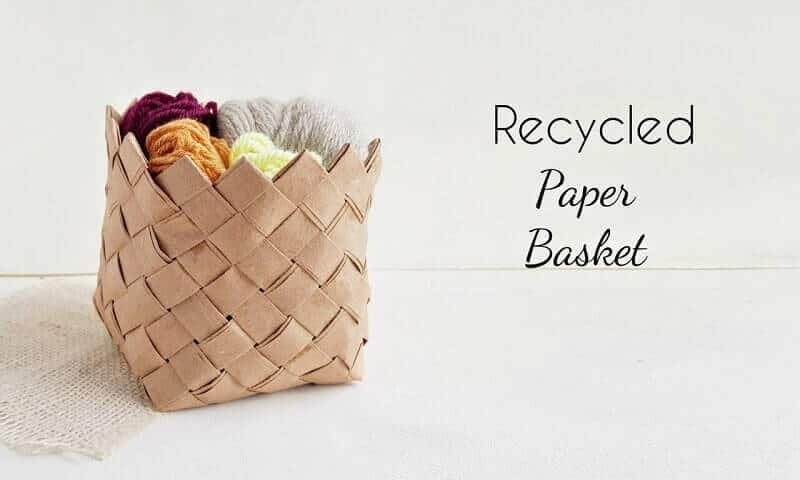
What makes paper weaving particularly fascinating is its sustainability aspect. Instead of using traditional materials like wood or plastic, paper weaving allows us to repurpose old newspapers, magazines, or scrap papers that would otherwise end up in landfills.
As someone who loves exploring different creative outlets, I stumbled upon paper weaving during one of my research sessions. Intrigued by its history and potential for artistic expression, I decided to give it a try myself. Little did I know that this craft would become not only a hobby but also an eco-friendly way for me to create unique pieces.
One of the greatest advantages of paper weaving is its accessibility – it can be enjoyed by people of all ages and skill levels. Whether you are a beginner looking for a new pastime or an experienced crafter seeking fresh inspiration, paper weaving offers endless possibilities for creativity.
Key Takeaways
- Paper weaving is a creative and sustainable craft that can be used to make beautiful baskets.
- To get started, you’ll need some basic materials and tools, including paper strips, scissors, and glue.
- Choosing the right paper for your project is important, as different types of paper will have different textures and colors.
- There are a variety of weaving techniques you can use, from basic over-under weaving to more advanced patterns.
- Once you’ve mastered the basics, you can add color and texture to your baskets with paint, markers, or other embellishments.
Materials and Tools Needed for Paper Basket Weaving
To get started with paper basket weaving, you’ll need some basic materials and tools. First and foremost, you’ll need strips of paper suitable for weaving. While any type of paper can be used in theory, certain types work better than others due to their flexibility and durability.
Newspapers are commonly used because they are readily available and easy to work with; however, they may not provide the desired aesthetic appeal due to their black-and-white print patterns. If you prefer more vibrant colors or patterns in your baskets, consider using magazines or colored construction papers instead.
In addition to the right kind of paper strips (which can be cut manually or purchased pre-cut), there are several essential tools you’ll need as well:
1. Scissors: For cutting paper strips to the desired length and width.
2. Ruler: To ensure accuracy in measuring and cutting the paper strips.
3. Pencil or pen: For marking guidelines on the paper if needed.
4. Glue or adhesive tape: To secure the ends of the paper strips during weaving.
While these tools are sufficient for basic paper basket weaving, there are also optional tools that can enhance your crafting experience, such as a bone folder for creasing the paper strips neatly, a cutting mat for precise cuts, and a craft knife for intricate designs.
Choosing the Right Paper for Your Basket Weaving Project
When it comes to choosing the right type of paper for your basket weaving project, there are several factors to consider. The first is durability – you want a material that will hold up well under tension without tearing or fraying easily.
Newspapers are often chosen because they have enough flexibility to be woven tightly while still maintaining their strength. Magazines can also work well due to their glossy finish, which adds an interesting visual element to your baskets.
Another factor to consider is color and pattern. If you’re looking for vibrant colors or specific patterns in your baskets, magazines or colored construction papers may be more suitable options than newspapers alone.
It’s important to note that different types of papers require different techniques when it comes to weaving them together. Newspapers tend to be more pliable and forgiving, making them ideal for beginners who are still mastering basic techniques. On the other hand, magazines may require more precision due to their thicker pages and glossy coating.
Experimenting with different types of papers will help you discover which ones work best for your desired outcome and personal preferences.
Basic Weaving Techniques for Beginners
| Basic Weaving Techniques for Beginners |
|---|
| 1. Plain weave |
| 2. Twill weave |
| 3. Basket weave |
| 4. Herringbone weave |
| 5. Leno weave |
| 6. Satin weave |
| 7. Tapestry weave |
| 8. Overshot weave |
| 9. Double weave |
| 10. Pile weave |
Now that we have our materials ready let’s dive into some basic weaving techniques that beginners can start with:
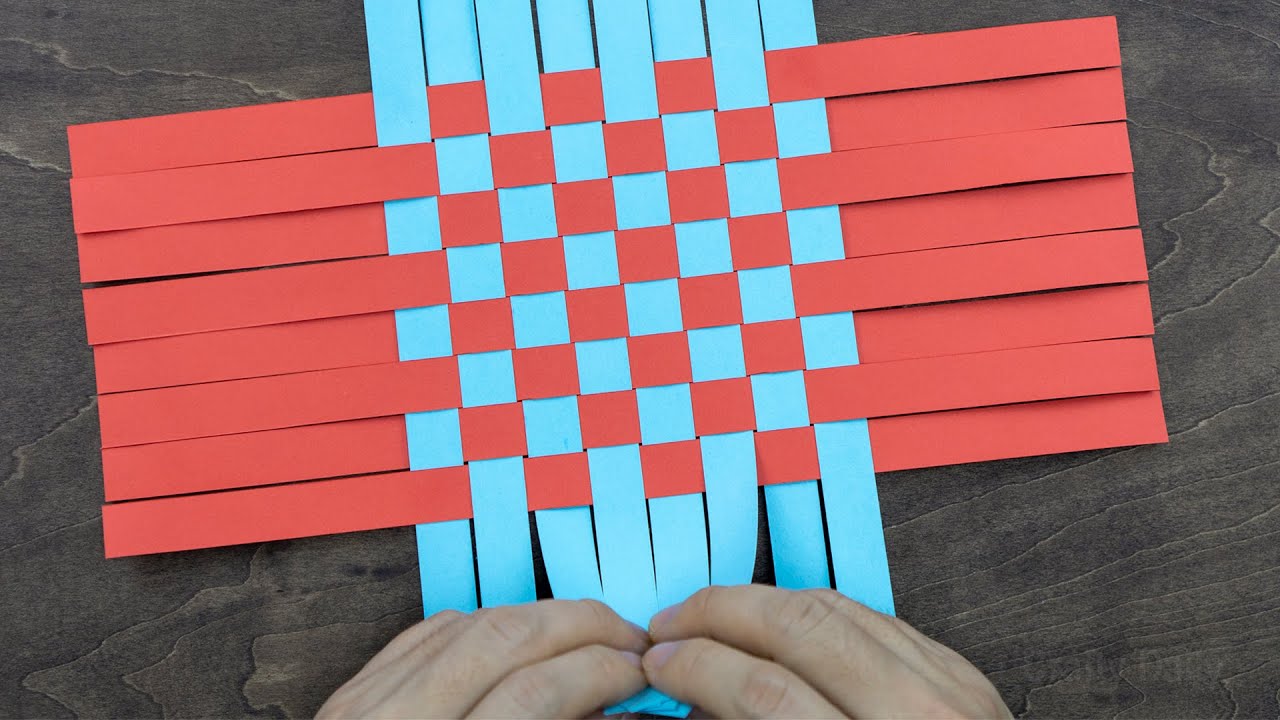
1) Over-under weave: This is one of the simplest techniques and forms the foundation of many basket designs. Start by placing a strip of paper horizontally, then weave another strip vertically over and under the horizontal strip. Repeat this process, alternating the direction of each vertical strip until you reach the desired width.
2) Twill weave: This technique creates a diagonal pattern in your basket. Begin by weaving a horizontal strip over two vertical strips, then under one, and repeat this pattern until you reach the end. For the next row, start with weaving under two vertical strips instead of over.
3) Checkerboard weave: As the name suggests, this technique creates a checkerboard pattern in your basket. Start by weaving one horizontal strip over one vertical strip, then under one. Repeat this pattern until you reach the end of your row. For subsequent rows, alternate between starting with “over” or “under.”
When starting out with these basic techniques, it’s important to focus on creating a sturdy base for your basket. This will provide stability as you continue to build up its sides.
One common mistake beginners make is not pulling their paper strips tightly enough during weaving. This can result in loose or uneven baskets that lack structural integrity. To avoid this issue, make sure to pull each paper strip snugly before moving on to the next one.
Varying tension throughout your weaving can also create interesting patterns and textures within your baskets – don’t be afraid to experiment!
Advanced Weaving Techniques for Experienced Crafters
Once you’ve mastered the basic techniques and feel comfortable with paper basket weaving, it’s time to explore more complex patterns and designs that will take your creations to new heights.
1) Diagonal weave: This technique involves creating diagonal lines within your basket design by angling each woven strip slightly as you progress upward from its base.
To achieve this effect:
– Start with an even number of vertical strips.
– Weave each horizontal strip at an angle across two vertical strips, alternating the direction with each row.
– Continue weaving in this manner until you reach the desired height.
2) Twisted weave: This technique adds a unique twist (literally!) to your baskets by incorporating twisted paper strips. To create this effect:
– Cut two long paper strips and twist them together tightly.
– Weave these twisted strips into your basket, alternating with regular flat strips.
– The twisted sections will add visual interest and texture to your design.
3) Openwork weave: This technique involves creating open spaces within your basket by intentionally leaving gaps between woven strips. It can be used to create intricate patterns or simply add a touch of elegance to your design.
To achieve an openwork effect:
– Weave one strip over two verticals, then under one.
– Skip the next vertical strip and continue weaving over two and under one until you reach the end of the row.
– For subsequent rows, alternate starting with “over” or “under” as needed.
These advanced techniques require patience and precision but can result in stunningly intricate designs that showcase your skill as a paper weaver. Don’t be discouraged if it takes some practice to get them just right – remember that every mistake is an opportunity for growth!
Adding Color and Texture to Your Paper Baskets

While paper weaving alone can create beautiful baskets, adding color and texture takes them to another level of visual appeal. There are several techniques you can use to achieve this:
1) Dyeing paper: If you want more control over the colors in your baskets, consider dyeing plain white or light-colored papers before weaving them. You can use fabric dyes or even natural dyes made from plants like beetroot or turmeric for an eco-friendly approach.
To dye paper:
– Prepare a dye bath according to the instructions on the dye package.
– Submerge your paper strips into the dye bath for a few minutes or until you achieve the desired color.
– Remove the strips and let them dry completely before using them for weaving.
2) Painting paper: Another way to add color to your baskets is by painting the paper strips. Acrylic paints work well for this purpose, as they adhere easily to paper and provide vibrant colors.
To paint paper:
– Lay out your paper strips on a protected surface, such as a plastic sheet or old newspaper.
– Use a brush or sponge to apply thin layers of paint onto the strips, allowing each layer to dry before adding another if desired.
– Experiment with different painting techniques like blending colors or creating patterns for unique effects.
3) Incorporating different textures and materials: To add texture and visual interest to your baskets, consider incorporating other materials into your weaving. For example, you can weave in ribbons, fabric scraps, or even natural fibers like jute twine or raffia. These additions not only enhance the overall look of your basket but also provide tactile elements that make it more engaging.
When working with different textures and materials, it’s important to consider their compatibility with the chosen type of paper. Ensure that they can be woven together smoothly without compromising the structural integrity of your basket.
Creating a cohesive color scheme is essential when adding color and texture to your baskets. Consider using complementary colors or sticking within a specific palette that matches your personal style or home decor theme. This will give your creations a polished look while showcasing your artistic vision.
Embellishing Your Baskets with Beads, Ribbons, and Other Decorative Elements
Now that you’ve mastered various weaving techniques and added color and texture to your baskets let’s explore ways in which you can further personalize them by embellishing with beads, ribbons, and other decorative elements.
1) Beads: Adding beads can instantly elevate the visual appeal of any basket design. You can incorporate them into specific patterns within your weaving or attach them as decorative accents along the edges or handles of your baskets.
To securely attach beads:
– Thread a needle with a strong thread or thin wire.
– Pass the needle through the bead and then through the woven paper, ensuring it is tightly secured.
– Repeat this process for each bead, spacing them evenly according to your desired design.
2) Ribbons: Ribbons are versatile embellishments that can be used to add a touch of elegance or whimsy to your baskets. You can weave them into specific patterns within your basket design, tie bows around handles, or create decorative borders along the edges.
To securely attach ribbons:
– Use small dabs of glue on the backside of the ribbon to hold it in place while weaving.
– Alternatively, you can stitch ribbons onto specific sections of your basket using a needle and thread for added durability.
3) Other decorative elements: Don’t limit yourself to just beads and ribbons – there are countless other materials you can use to embellish your baskets. Consider attaching buttons, sequins, feathers, dried flowers, or even small trinkets that hold sentimental value. These personal touches will make each basket truly unique and reflective of its creator’s personality.
When adding embellishments, it’s important to strike a balance between visual appeal and functionality. Ensure that any added elements do not interfere with the structural integrity of your basket or make it impractical for everyday use if that is its intended purpose.
Creating Different Shapes and Sizes of Baskets with Paper Weaving
While traditional baskets are often round in shape, paper weaving allows for endless possibilities when it comes to creating different shapes and sizes. Here are some techniques you can use:
1) Round baskets: To create round baskets using paper weaving techniques:
– Start by creating a sturdy circular base using either concentric circles (weaving strips around one another) or radiating spokes (weaving strips from the center outward).
– Gradually build up the sides of your basket by weaving additional strips in a circular pattern, ensuring that each strip is tightly secured to maintain the shape.
2) Oval baskets: Oval baskets can be created by slightly altering the round basket technique:
– Begin with a circular base as described above.
– As you build up the sides, gradually introduce longer strips on opposite ends of your basket to create an elongated oval shape.
3) Square or rectangular baskets: Creating square or rectangular baskets requires a different approach:
– Start with a square or rectangular base made by weaving strips in both horizontal and vertical directions.
– Build up the sides by continuing to weave additional strips around all four edges until you reach the desired height.
Adjusting the size of your basket is relatively simple. To make it larger, continue adding more rows of weaving until you achieve the desired dimensions. Conversely, if you want a smaller basket, reduce the number of rows accordingly while maintaining proper proportions for aesthetic appeal.
Don’t be afraid to experiment with unique shapes and designs that go beyond traditional forms. By pushing boundaries and exploring new possibilities, you’ll discover exciting ways to express your creativity through paper weaving.
Tips for Storing and Displaying Your Paper Baskets
Once you’ve completed your paper baskets, it’s important to store them properly to prevent damage and ensure their longevity. Here are some tips for storing and displaying your creations:
1) Store in a dry environment: Moisture can cause paper to warp or become brittle over time. Therefore, it’s essential to store your paper baskets in a dry environment away from direct sunlight or areas prone to humidity.
2) Use acid-free tissue paper: If you need to stack multiple baskets together for storage purposes, place acid-free tissue paper between each layer. This will help prevent any color transfer or damage caused by friction between surfaces.
3) Avoid excessive weight on top: While paper baskets are sturdy, they can still be susceptible to damage if heavy objects are placed on top of them. Avoid stacking other items on your baskets to prevent crushing or deformation.
When it comes to displaying your paper baskets, the possibilities are endless. Here are a few ideas:
– Arrange them on open shelves or bookcases for easy access and visual appeal.
– Hang them on walls using decorative hooks or display stands.
– Use them as centerpieces for tables or mantels during special occasions.
– Incorporate them into gallery walls alongside other artwork and decor pieces.
Remember that each basket is a unique work of art, so take pride in showcasing your creations in ways that highlight their beauty and craftsmanship.
Using Paper Weaving to Create Unique Gifts and Home Decor

Paper weaving offers countless opportunities for creating unique gifts and home decor items that will impress your friends and loved ones. Here are some ideas to get you started:
1) Home decor accents: Create woven paper bowls, trays, or wall hangings that add a touch of handmade charm to any room. Experiment with different colors, patterns, and textures to match the existing decor theme.
2) Storage solutions: Weave small boxes or containers that can be used for organizing jewelry, office supplies, or other small items around the house. Customize these containers with personalized designs or labels for an extra special touch.
3) Personalized gifts: Use paper weaving techniques to create one-of-a-kind gifts for birthdays, weddings, anniversaries, or any other special occasion. Consider weaving personalized messages into the design, such as names, dates, or meaningful quotes. These personalized gifts will not only showcase your creativity and thoughtfulness but also serve as a cherished keepsake for the recipient. Whether it’s a woven photo frame, a woven journal cover, or even a woven wall hanging, the possibilities are endless when it comes to creating unique and heartfelt gifts using paper weaving techniques. The recipient will surely appreciate the time and effort you put into crafting a gift that is truly special and tailored just for them.
FAQs
What is paper weaving?
Paper weaving is a technique of interlacing strips of paper to create a pattern or design. It is similar to traditional weaving, but instead of using yarn or fabric, paper strips are used.
What kind of paper is best for weaving?
Thin and flexible paper, such as construction paper, tissue paper, or wrapping paper, is best for weaving. Avoid using thick or stiff paper, as it can be difficult to weave and may not hold its shape well.
What tools do I need for paper weaving?
You will need paper strips, scissors, a ruler, and glue. Optional tools include a cutting mat, a craft knife, and a bone folder.
How do I create a paper basket?
To create a paper basket, start by weaving a base using a simple over-under pattern. Then, weave the sides of the basket by folding the paper strips over the edges of the base and weaving them in and out of the base strips. Finally, fold the top edges of the basket down and glue them in place.
What are some tips for creating a beautiful paper basket?
Some tips for creating a beautiful paper basket include choosing complementary colors, using a variety of weaving patterns, and adding embellishments such as ribbon or beads. It is also important to be patient and take your time, as paper weaving can be a delicate and intricate process.
Originally posted 2024-01-14 02:08:39.