Introduction
Embarking on a knitting project is an adventure filled with intricate patterns and cozy outcomes, but the final touches are what elevate your creation from homemade to handcrafted excellence.
One such essential skill is learning how to weave in ends in knitting, a technique that secures the yarn tails to ensure the durability and neatness of your work.
Whether you’re working with the chunky wool on 8mm bamboo knitting needles or a finer yarn, mastering this finishing step is crucial for any knitter aiming for a polished result.
Weaving in ends not only prevents your knitted pieces from unraveling but also contributes to a professional and clean appearance, hiding yarn transitions and excess tails from view.
This guide will walk you through the necessary tools and provide a step-by-step approach to weaving in ends, along with tips to avoid common pitfalls. With patience and practice, you’ll be able to seamlessly integrate this technique into your knitting repertoire, ensuring each project is as beautiful as it is sturdy.
Why weaving in ends is important
Prevents unraveling
One of the paramount reasons for weaving in ends is to safeguard your knitting from the dreaded fate of unraveling. Loose ends can act as the starting point for stitches to slip and slide, potentially leading to a domino effect of unraveling work that can undo hours of effort.
By securely weaving in these ends, you create a stable structure within your knitted fabric, ensuring that each stitch remains intact and your garment retains its shape and strength over time.
Moreover, a well-woven end is synonymous with the longevity of your knitted items. It’s the hidden hero that works tirelessly behind the scenes to keep your stitches in place, even through the wear and tear of regular use and washes.
By meticulously weaving in ends, you’re investing in the durability of your knitting, making it a cherished piece that can withstand the test of time and become a potential heirloom.
Creates a professional finish
Aside from the structural integrity it provides, weaving in ends is instrumental in achieving a professional finish that distinguishes a well-crafted piece from a novice creation.
This meticulous process conceals yarn ends within the fabric, ensuring they remain invisible on the right side and do not mar the aesthetic of your work. A project with ends properly woven in exudes a level of craftsmanship that is both visually appealing and indicative of a knitter’s attention to detail.
Furthermore, a project finished with woven ends is more comfortable to wear, as there are no loose strands to irritate the skin or catch on accessories.
This step, often overlooked by beginners, is a hallmark of quality in hand-knitted items, offering a clean and tailored look that rivals commercially made garments. By mastering the art of weaving in ends, knitters elevate their work to a professional standard, ensuring each piece is as pleasing to the eye as it is to the touch.
Tools needed for weaving in ends

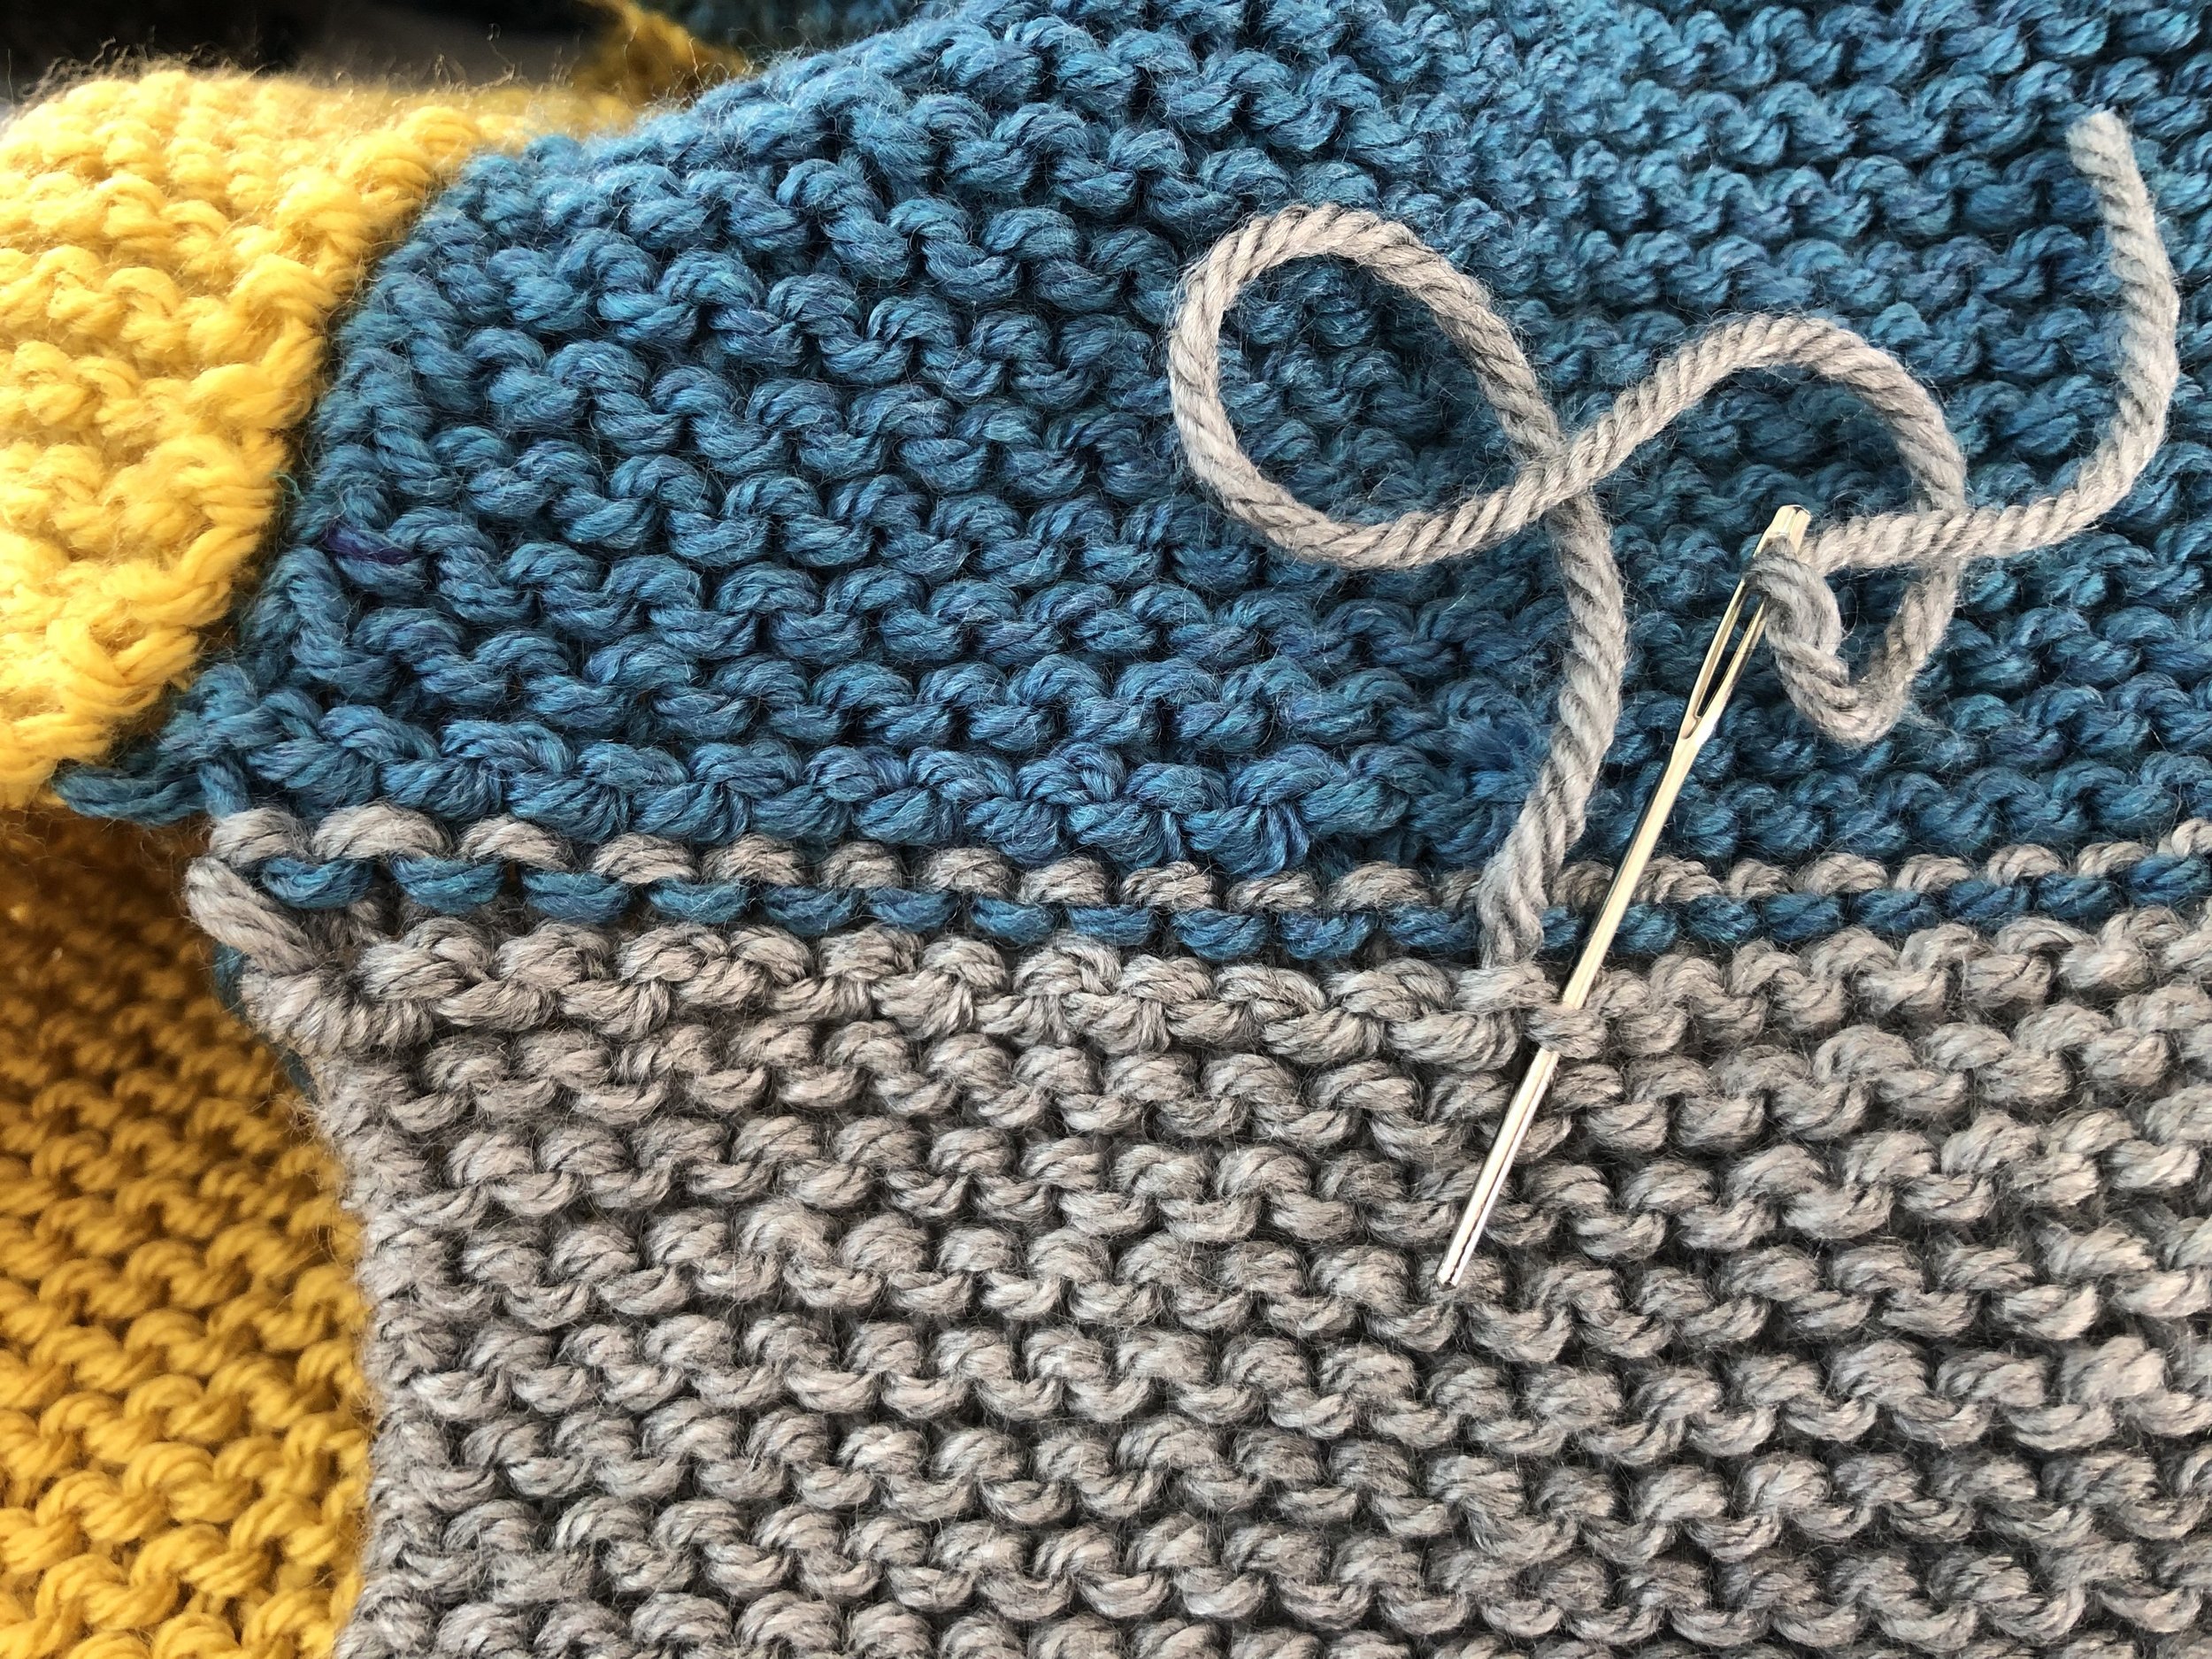
Tapestry needle
A tapestry needle is an indispensable tool for weaving in ends, serving as a bridge to seamlessly integrate yarn tails into your knitting. Its blunt tip and large eye make it ideal for threading through the fabric without splitting yarn fibers or damaging the work.
When selecting a tapestry needle, opt for one that complements the weight of your yarn; a needle that’s too large can stretch the stitches, while one that’s too small may make the task unnecessarily difficult.
Using a tapestry needle allows for precision and control as you guide the yarn through the stitches, ensuring a secure and discreet finish.
Whether you’re weaving ends along the edge or diagonally through the fabric, the tapestry needle is your ally in creating a polished, enduring piece.
Remember, a well-chosen tapestry needle can transform the post-knitting experience from a chore to a satisfying final touch on your handcrafted creation.
Scissors
Scissors are the next essential tool in your knitting kit for weaving in ends. A sharp pair of scissors is crucial for trimming yarn tails to the perfect length after securing them within your work.
The right scissors will allow you to cut close to the fabric without fraying the yarn or leaving unsightly stubs that could work their way to the front of the project. It’s advisable to use scissors dedicated solely to your knitting endeavors to maintain their sharpness and precision.
When it comes to trimming, it’s important to leave just enough yarn to ensure the ends stay put without poking through to the right side, as recommended by Interweave.
After weaving in your ends, a gentle wash can help settle the stitches, making it safer to trim the yarn without the risk of unraveling. With the right scissors in hand, you’ll put the finishing touches on your knitting project, ensuring a neat and durable result that stands the test of time.
Step-by-step guide to weaving in ends
Thread the yarn onto the tapestry needle
Threading the yarn onto the tapestry needle is the first step in the process of weaving in ends. Begin by cutting a length of yarn that is easy to manage, typically around 18 inches, to avoid tangling. Then, gently pinch the end of the yarn between your fingers, creating a flattened tip that will slide through the eye of the needle with ease.
If you’re struggling to thread the needle, you might consider using a needle threader or slightly moistening the yarn end to stiffen it. Once the yarn is securely in place, you’re ready to move on to the next step of weaving it through the stitches, as detailed in the tutorials provided by Nimble Needles and Studio Knit.
It’s important to ensure that the yarn is not twisted or knotted as it could affect the tension and final appearance of your work. A smooth threading process sets the stage for a seamless weave-in, contributing to the overall quality and longevity of your knitting project.
With the yarn properly threaded onto the tapestry needle, you’re well on your way to mastering the art of weaving in ends, creating a clean and professional finish that enhances the beauty of your handiwork.
Weave the yarn through the stitches
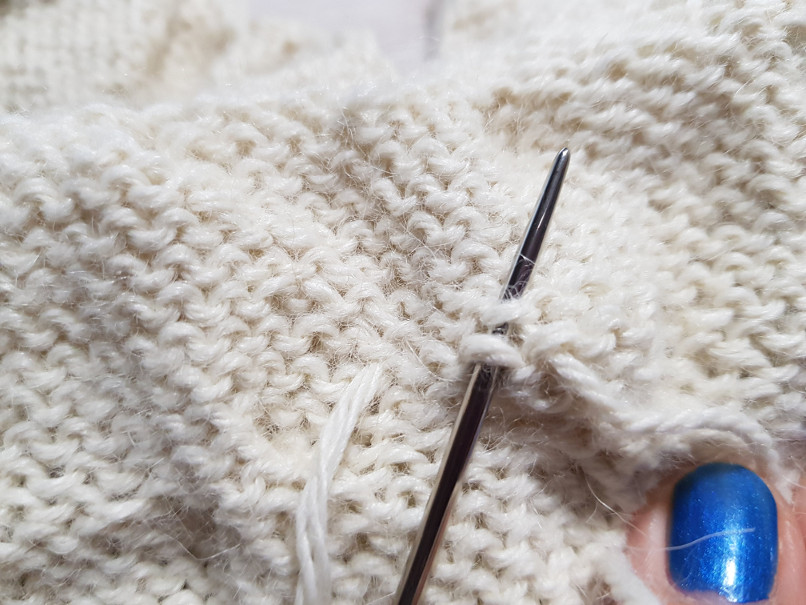
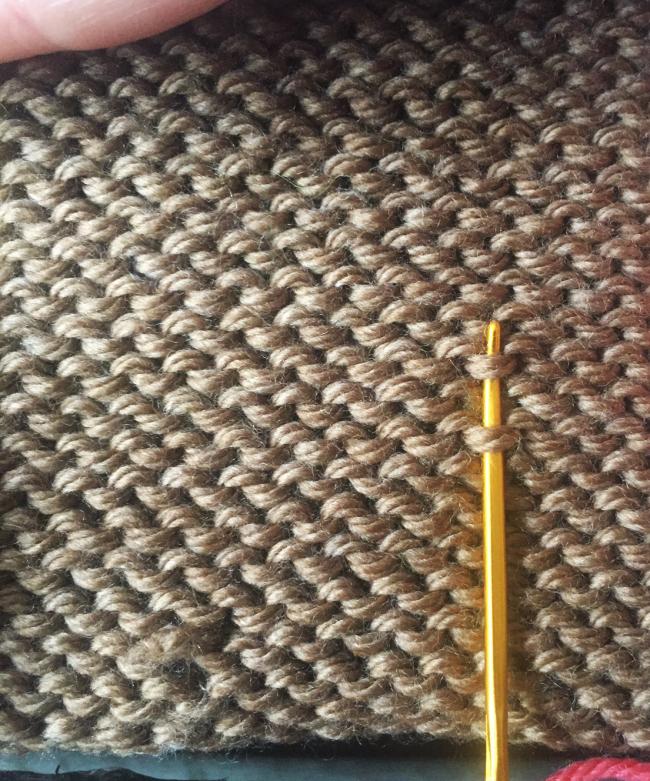
With the yarn securely threaded onto your tapestry needle, it’s time to weave it through the stitches on the wrong side of your knitting.
This crucial step involves guiding the needle through the existing stitches, mimicking the path of the knit to camouflage the end. Aim to weave through the purl bumps or along the edges, as these areas tend to hide the yarn end more effectively.
The goal is to distribute the yarn end in a way that mirrors the tension of the surrounding fabric, ensuring that it remains invisible on the right side and does not alter the garment’s fit or feel.
As you weave, be mindful of the direction in which you’re working. It’s often recommended to follow the natural flow of the stitch pattern, which can mean weaving vertically up a column or horizontally along a row. This technique not only secures the yarn end but also maintains the fabric’s elasticity.
For additional guidance on weaving techniques that result in a discreet and secure finish, resources like The Spruce Crafts offer valuable insights. Remember, patience and attention to detail during this step will pay off, leaving you with a beautifully finished piece that stands up to wear and washing.
Cut off the excess yarn

Once the end is woven in satisfactorily, the final step is to trim the excess yarn. This should be done carefully to avoid cutting too close to the fabric, which could result in the end popping out over time. Leave a small tail, about a quarter of an inch, to allow for any potential movement within the stitches.
As demonstrated in the tutorials from Interweave, trimming the ends flush with the fabric can create a neat finish without any unsightly protrusions. Ensure your scissors are sharp for a clean cut, which will help prevent fraying and maintain the integrity of your work.
After trimming, gently stretch the area where the end was woven in to ensure the tail is fully integrated into the fabric and does not stick out. This simple action helps to settle the yarn end into place, further concealing it within the stitches.
With the excess yarn cut and the end securely woven in, your knitting project boasts a polished and durable finish, ready to be worn or gifted with pride.
The meticulous process of weaving in ends, as outlined in the step-by-step guide, culminates in this satisfying final touch, marking the completion of your knitting masterpiece.
Tips for weaving in ends neatly
Weave in the ends as you go
For a seamless knitting experience, consider the “weave in as you go” technique, which allows you to incorporate yarn ends into your work without interrupting the flow of your stitching.
This method is particularly effective when using feltable fibers, as it ensures that the ends are secured within the fabric as you knit.
Begin by preparing for a yarn change a few stitches in advance, integrating the new yarn by trapping it with the old yarn and continuing to knit as normal. This proactive approach, detailed in tutorials from Nimble Needles, not only saves time but also reduces the need for post-knitting clean-up.
While weaving in ends as you go, it’s essential to maintain the fabric’s consistency by avoiding knots and ensuring the yarn is not too tightly woven, which could distort the garment’s shape.
By strategically planning where to place these ends, such as at the edges of your work, you can enhance the comfort and appearance of the finished piece.
Always check the right side of your knitting to confirm that the ends remain invisible, and remember that this technique may not be suitable for reversible projects where the wrong side is just as visible as the right.
Weave in the ends in the same direction as the stitches
To achieve a truly professional and inconspicuous finish, it’s advisable to weave in ends following the path of the stitch pattern. This technique aligns the yarn end with the natural flow of the fabric, making it less noticeable and more secure.
When the yarn end is threaded through the stitches in the same direction as the knit or purl pattern, it mimics the yarn’s original course, blending seamlessly into the texture of the garment.
This method, as shown in the Studio Knit tutorial, is particularly effective for maintaining the elasticity of the fabric and ensuring that the woven-in ends move with the garment, rather than restricting it.
Furthermore, by weaving in ends in the direction of the stitches, you minimize the risk of the ends becoming loose or creating an uneven surface on the right side of the work. It’s a detail-oriented process that pays off in the longevity and neatness of your knitting projects.
Whether you’re working on a simple scarf or an intricate sweater, this approach to weaving in ends contributes to a refined and durable finish that stands the test of time and wear.
Common mistakes to avoid when weaving in ends
Leaving the ends too short
One common pitfall in the process of weaving in ends is trimming them too short before securing them into the fabric. It’s crucial to leave a tail of about four to six inches to ensure you have enough yarn to work with, as recommended by The Spruce Crafts.
This length allows for a secure weave that can withstand the fabric’s natural movement and the stress of washing. If the ends are too short, they may not stay woven in, leading to the risk of unraveling and compromising the integrity of your knitted piece.
Moreover, it’s wise to wash your knitted item before the final trim of the yarn ends. Washing can cause the fabric to settle and change slightly, which might affect the tension and placement of the woven-in ends.
By postponing the final cut until after washing, you ensure that the ends are still long enough to remain securely in place, as they may otherwise work their way to the front of the fabric or slip out, as noted by Sheep Among Wolves. Patience and attention to detail in this final step are key to a polished and enduring finish.
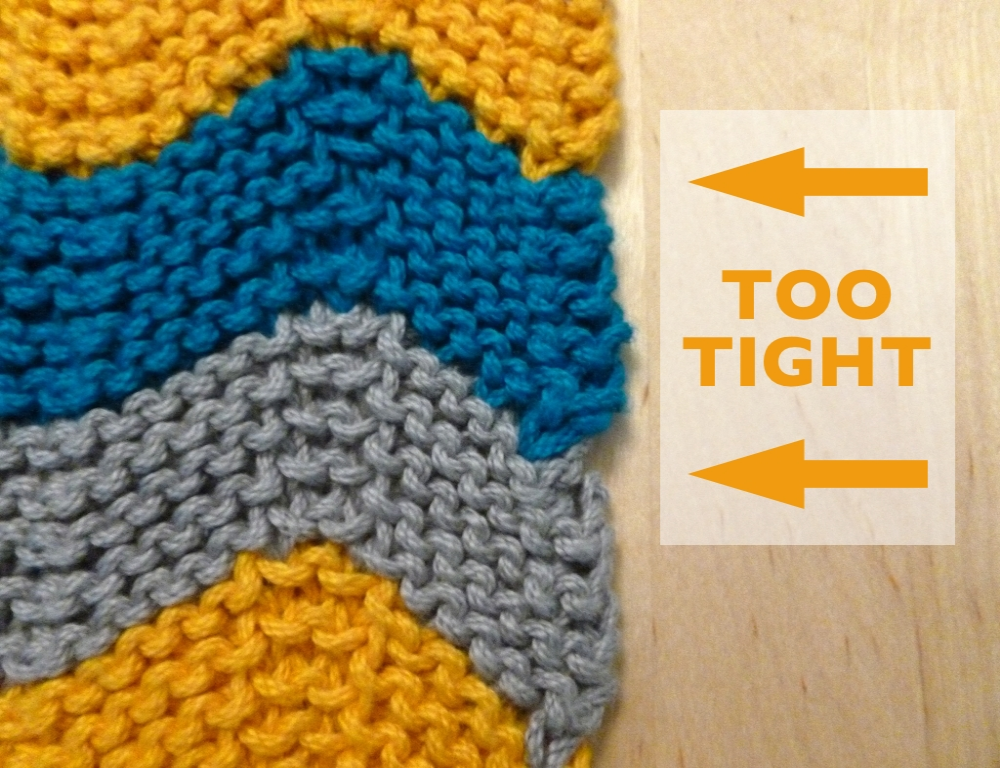
Weaving in ends too tightly
Another mistake to be wary of is weaving in ends with too much tension, which can distort the fabric and create a puckered appearance. It’s essential to maintain the same elasticity as the rest of your knitting to ensure that the woven-in ends do not pull or gather the fabric unnaturally.
When securing the ends, aim for a gentle, snug fit that allows the yarn to lay flat and move with the knitted piece, rather than constricting it. This careful balance ensures that the ends stay put without affecting the garment’s overall look and feel.
Remember, the goal is to make the ends virtually undetectable while preserving the fabric’s integrity. Weaving in ends too tightly can also lead to discomfort when wearing the finished piece, as the rigid ends may irritate the skin.
To avoid this, weave in ends with a relaxed hand, and periodically check the right side of the work to ensure that the ends are not visible and the fabric lays smoothly. By doing so, you’ll achieve a comfortable, wearable, and aesthetically pleasing result that reflects your skill and dedication to quality craftsmanship.
Final thoughts on how to weave in ends knitting
Mastering the art of weaving in ends is a testament to the meticulous nature of knitting and the pursuit of perfection in every stitch. It’s a skill that elevates the durability and beauty of your work, ensuring that each piece not only looks professional but also stands the test of time.
As you apply these techniques, remember to weave on a diagonal, split the yarn, and leave a quarter-inch tail post-blocking for optimal results, as suggested by Interweave.
With patience and practice, the process of weaving in ends will become an intuitive and rewarding part of your knitting routine.
Whether you’re a novice or have been knitting for decades, the continuous learning and refining of techniques like weaving in ends contribute to the ever-evolving craft of knitting. By avoiding common pitfalls and embracing the detailed guidance provided by experts, your finished knits will not only look impeccable but also feel secure and comfortable.
Embrace the challenge, and take pride in the knowledge that with every end neatly tucked away, you’re crafting a legacy of hand-knitted treasures that will be cherished for years to come.
Sources:
- https://www.interweave.com/article/knitting/how-weave-in-yarn-ends-so-dont-pop-out/
- https://nimble-needles.com/tutorials/how-to-weave-in-ends-as-you-go/
- https://www.studioknitsf.com/weave-ends-knitting/
- https://www.thesprucecrafts.com/weaving-in-ends-2116473
- https://www.stitchandstory.us/blogs/knitting-tips/6-ways-to-weave-in-chunky-yarn
- https://sheepamongwolves.net/2018/01/how-to-weave-in-ends-like-a-pro/
FAQ on how to weave in ends knitting
-
How do you sew in ends in knitting?
Thread your tail on your tapestry needle and then weave it in diagonally by going right through the purl bumps. Don’t go around them, spear right through them! Go through at least 5-6 stitches in that manner. Pull the tail through and go for another 5-6 stitches in a different direction.
-
Why do you weave in the ends of knitting?
Why do we weave in ends? To make sure they are secure and prevent your project from unravelling. To hide the ends so that they are invisible on the right or front side and don’t poke through. To make your project neater, give it a finished look, and more comfortable to wear.
-
Should you weave in ends before or after blocking knitting?
Also, if you weave before washing and blocking, and the fabric relaxes, it can result in a pucker or bunch in the fabric. I don’t disagree that washing and blocking after the ends are woven, on a felty sort of yarn, help the ends to grab onto the fabric and stay put.
-
How do you bury the ends of knitting?
General Tips for Weaving in Ends Work the yarn through the stitches on the wrong side of your project. Working through purl loops is the most popular method, as the loops hide the extra yarn well. If your yarn ends are on the edge of the work, stitching along the edge works well.
Originally posted 2023-11-12 09:03:12.