
Rigid heddle weaving is a fascinating craft that allows you to create beautiful textiles using a simple loom. Unlike other types of weaving, which can be complex and require specialized equipment, rigid heddle weaving is accessible to beginners and can be done with minimal investment. In this article, I will guide you through the process of learning this craft, from choosing the right yarn for your project to troubleshooting common problems.
The benefits of learning rigid heddle weaving are numerous. Not only does it provide a creative outlet for self-expression, but it also offers a sense of accomplishment as you watch your fabric take shape under your hands. Weaving can be a meditative practice that helps relieve stress and promotes mindfulness. Additionally, by creating your own textiles, you have the opportunity to customize colors and patterns to suit your personal style.
Key Takeaways
- Rigid heddle weaving is a great way to create beautiful and unique scarves and other projects.
- Choosing the right yarn is important for achieving the desired look and feel of your finished product.
- Properly setting up your loom and understanding the basics of weaving are crucial for success.
- Tension and beat are key factors in achieving consistency in your weaving.
- With practice and experimentation, you can create a wide variety of projects using a rigid heddle loom.

Choosing the Right Yarn for Your Project
When embarking on a new weaving project, one of the most important decisions you’ll make is selecting the right yarn. There are several factors to consider when making this choice: fiber content, weight (or thickness), and color palette.
For beginners, I recommend starting with yarns that are easy to work with and forgiving of mistakes. Cotton or cotton-blend yarns are an excellent choice because they have good drape and are less likely to stretch or shrink during the finishing process.
Setting Up Your Loom: Warping the Rigid Heddle
Before you can begin weaving on a rigid heddle loom, you need to set up your loom by warping it with yarn. This may sound intimidating at first, but with practice and patience, it becomes second nature.
To warp your loom:
1) Attach one end of your warp yarn to the back beam.
2) Pass the warp thread through each slot in the rigid heddle.
3) Securely tie off the other end of the warp yarn to the front beam.
It’s important to maintain even tension throughout the warping process to ensure a smooth weaving experience. One common mistake beginners make is pulling too tightly, which can lead to a distorted fabric. Take your time and adjust as needed.
Understanding the Basics of Weaving: The Warp and Weft
To understand weaving, it’s essential to grasp the concept of warp and weft. The warp threads are those that run vertically on your loom, while the weft threads are woven horizontally through them.
The most basic weave structure is plain weave, where each weft thread alternates going over and under each warp thread. This creates a balanced fabric with equal amounts of warp and weft showing on both sides.
To weave a basic plain weave:
1) Lift up one heddle (either up or down).
2) Pass your shuttle (a tool used to hold your weft yarn) through the opening created by lifting the heddle.
3) Beat down firmly with your beater (a tool used to press down on each row of weft).
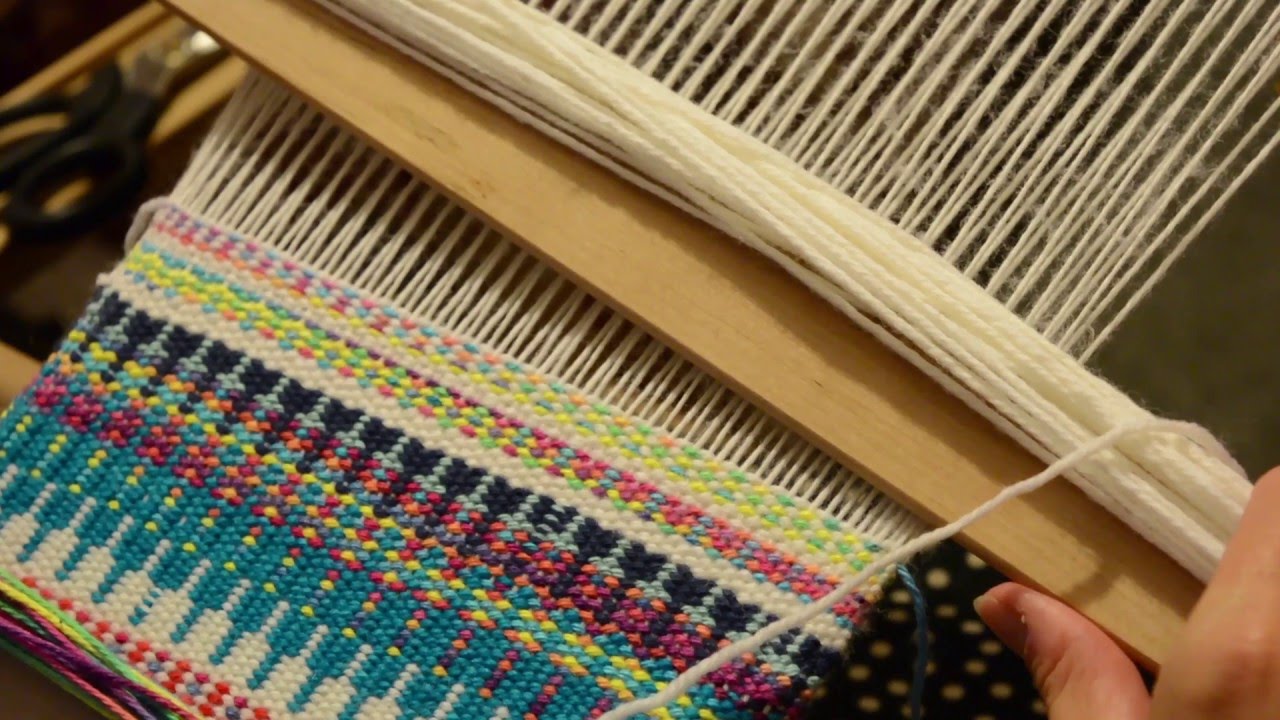
Creating Patterns with the Rigid Heddle Loom
Once you’ve mastered plain weave, you can begin exploring pattern weaving using pick-up sticks. Pick-up sticks allow you to manipulate specific warp threads, creating intricate designs within your fabric.
To use pick-up sticks:
1) Place one pick-up stick behind a group of desired warp threads.
2) Lift those threads using either another stick or your fingers.
3) Insert your shuttle through this opening.
4) Beat down firmly before repeating with different groups of warp threads for more complex patterns.
Pattern weaving opens up endless possibilities for creativity in rigid heddle weaving. You can experiment with different combinations of lifted and lowered threads to create unique designs that reflect your personal style.
Tension and Beat: Achieving Consistency in Your Weaving
Achieving consistent tension and beat is crucial for producing high-quality woven fabric. Tension refers to the evenness of your warp threads, while beat refers to the firmness with which you press down on each row of weft.
To maintain consistent tension:
1) Regularly check the tension of your warp threads as you weave.
2) Adjust by gently pulling or releasing slack as needed.
To achieve a consistent beat:
1) Use a beater that feels comfortable in your hand.
2) Apply firm pressure without straining yourself.
3) Aim for an even density throughout your fabric.
Adding Fringe and Finishing Your Scarf
Once you’ve completed weaving your scarf, it’s time to add fringe and finish it off for a polished look. Fringe adds a decorative touch and can be customized to suit your preferences.
To add fringe:
1) Cut several lengths of yarn twice the desired length of your fringe.
2) Fold each length in half, creating a loop at one end.
3) Insert the loop through an opening at one end of your scarf.
4) Pull the loose ends through this loop, securing them tightly.
Finishing techniques vary depending on the fiber content of your yarn but often involve washing, blocking, and trimming any stray fibers. Follow specific instructions provided by yarn manufacturers or consult online resources for guidance.
Troubleshooting Common Weaving Problems

As with any craft, weaving comes with its fair share of challenges. However, armed with knowledge and practice, you can overcome common issues that may arise during the process.
One common problem is uneven selvedges (the edges of your fabric). To avoid this issue:
1) Pay attention to maintaining consistent tension throughout each row.
2) Practice using gentle yet firm pressure when beating down each weft thread.
Another challenge is achieving balanced fabric where both sides look similar. This can be achieved by:
1) Consistently beating down each row with the same pressure.
2) Regularly checking the tension of your warp threads.
Experimenting with Color and Texture in Your Weaving
Weaving offers endless opportunities for exploring color and texture in your projects. By incorporating different yarns, you can create unique designs that showcase your creativity.
To experiment with color:
1) Choose a color palette that inspires you.
2) Combine solid colors or variegated yarns to create visual interest.
3) Play with different combinations of warp and weft colors to achieve desired effects.
Texture can be added through techniques such as using thicker or thinner yarns, incorporating novelty yarns, or experimenting with different weave structures like twill or lace weaves. Don’t be afraid to step outside your comfort zone and try new things!
Beyond Scarves: Other Projects You Can Create with a Rigid Heddle Loom
While scarves are a popular choice for rigid heddle weaving, there are countless other projects you can explore once you’ve mastered the basics. Some examples include:
– Table runners
– Placemats
– Dish towels
– Shawls
– Blankets
These projects allow you to further develop your skills and challenge yourself creatively. The possibilities are truly endless!
Tips and Tricks for Successful Rigid Heddle Weaving
To ensure successful weaving experiences, here are some additional tips:
1) Take breaks when needed to prevent strain on your body.
2) Keep track of patterns using written notes or visual charts.
3) Join weaving communities online or locally for support and inspiration.
4) Invest in quality tools that feel comfortable in your hands.
Remember, practice makes perfect! Embrace the learning process and don’t be discouraged by mistakes along the way.
In conclusion, rigid heddle weaving is an accessible craft that offers a multitude of benefits. From the joy of creating your own textiles to the therapeutic nature of the process, this craft is worth exploring. By choosing the right yarn, setting up your loom correctly, understanding basic weaving techniques, and experimenting with color and texture, you can create beautiful and unique woven pieces.
While this article provides a comprehensive overview of rigid heddle weaving, there is always more to learn. I encourage you to continue your journey by seeking out additional resources such as books, online tutorials, or workshops. With dedication and practice, you’ll soon find yourself immersed in a world of creativity and self-expression through rigid heddle weaving. So go ahead – grab that loom and start weaving!
FAQs

What is rigid heddle weaving?
Rigid heddle weaving is a type of hand weaving that uses a loom with a rigid heddle to create a woven fabric.
What materials do I need for rigid heddle weaving?
You will need a rigid heddle loom, yarn, a shuttle, a pick-up stick, and a tapestry needle.
What types of yarn can I use for rigid heddle weaving?
You can use any type of yarn for rigid heddle weaving, but it is recommended to use a yarn that is suitable for the project you are making.
What is the process of rigid heddle weaving?
The process of rigid heddle weaving involves warping the loom, threading the heddle, weaving the fabric, and finishing the project.
What is warping?
Warping is the process of setting up the loom with the yarn, creating the foundation for the fabric.
What is threading the heddle?
Threading the heddle is the process of passing the yarn through the heddle, which creates the pattern for the fabric.
What is weaving?
Weaving is the process of passing the shuttle through the warp threads to create the fabric.
What is a pick-up stick?
A pick-up stick is a tool used in weaving to create patterns by picking up certain warp threads.
What is a tapestry needle?
A tapestry needle is a large, blunt needle used for weaving in the loose ends of yarn and finishing the project.
Originally posted 2024-01-15 04:42:17.