As a passionate weaver, I have come to understand the importance of finishing a weaving project properly. It is not just about completing the task at hand; it is about taking pride in your work and ensuring that your creation stands the test of time. Finishing your weaving loom is an essential step that should not be overlooked or rushed through. In this article, I will delve into the reasons why finishing your weaving loom is important, how to finish the weaving loom and explore the benefits of a well-finished project.
When you invest time and effort into creating a beautiful piece on your loom, it deserves to be finished with care and attention to detail. By properly finishing your weaving, you are giving it longevity and durability. A well-finished piece will hold up better over time, allowing you to enjoy its beauty for years to come.
Furthermore, finishing techniques can enhance the overall appearance of your weaving project. They can add polish and refinement, elevating it from a simple craft project to a work of art. Whether you choose to block your weaving for a smooth finish or add fringe for texture and movement, these techniques contribute to the final aesthetic appeal.
Key Takeaways
- Finishing your weaving loom is important to give your project a polished and professional look.
- Preparing your loom for finishing involves removing it from the loom and washing it.
- Choosing the right finishing technique depends on the type of project and the desired outcome.
- Blocking your weaving helps to even out the tension and shape of the fabric.
- Adding fringe, tassels, beads, embroidery, or a lining can add unique and personalized touches to your finished weaving.

Preparing Your Loom for Finishing
Before diving into any finishing techniques, it is crucial to prepare your loom adequately. This step ensures that there are no loose threads or knots that could unravel once you start working on the finishing touches.
Begin by cleaning and tidying up your loom thoroughly. Remove any dust or debris that may have accumulated during the weaving process using a soft brush or cloth. Pay close attention to hard-to-reach areas such as corners or crevices where dirt might hide.
Next, carefully inspect every inch of your woven fabric for loose threads or knots that need attention before proceeding with any further steps in the finishing process. These imperfections can compromise both the appearance and structural integrity of your weaving if left unaddressed.
Finally, make sure that your weaving is secure and even. Check for any areas where the tension may have loosened during the weaving process and adjust accordingly. A well-tensioned fabric will ensure that your finishing techniques are applied evenly and produce the desired results.
Choosing the Right Finishing Technique for Your Project
Different types of weaving projects call for different finishing techniques. The choice of technique depends on various factors such as the type of fabric, desired outcome, and personal preference. Let’s explore some common finishing techniques and factors to consider when choosing one for your project.
One popular technique is blocking, which involves wetting or steaming your woven fabric to shape it into its final dimensions. Blocking helps to even out any irregularities in tension or weave structure, resulting in a smooth and professional finish. It is particularly useful for projects with intricate patterns or delicate fibers that require careful shaping.
Another option is hemming, which involves folding over the edges of your fabric and securing them with stitches or adhesive tape. Hemming not only provides a clean edge but also prevents fraying over time. There are various hemming techniques available, including rolled hems for lightweight fabrics or blind hems for heavier materials.
If you want to add texture and movement to your weaving project, consider adding fringe as a finishing touch. Fringe can be created by unraveling threads from the edge of your fabric or attaching pre-made fringe trim using stitching or knotting techniques. It adds visual interest while also protecting the edges from fraying.
Blocking Your Weaving: Why and How

Blocking is an essential step in finishing many types of woven projects as it helps achieve a polished look while ensuring proper sizing and shape retention over time.
The benefits of blocking are numerous; it allows you to correct any unevenness in tension caused during the weaving process by gently stretching or shrinking specific areas as needed. This technique is particularly useful for projects with intricate patterns or delicate fibers that require careful shaping.
To block your weaving, start by determining whether wet blocking or steam blocking is more suitable for your fabric. Wet blocking involves soaking your woven piece in water and then gently stretching it to the desired dimensions before allowing it to dry completely. Steam blocking, on the other hand, requires using a steamer or iron to apply heat and moisture directly to the fabric while shaping it.
Regardless of the method you choose, always follow the manufacturer’s instructions for your specific type of fiber and weave structure. Take care not to overstretch or overheat your fabric as this can lead to irreversible damage.
Hemming Your Weaving: Tips and Tricks

Hemming is a finishing technique that provides a clean edge while preventing fraying over time. There are various hemming techniques available depending on the type of fabric and desired outcome.
For lightweight fabrics such as silk or cotton, a rolled hem is an excellent choice. To create a rolled hem, fold over the raw edge twice towards the wrong side of the fabric, securing it with small stitches along the folded edge. This technique creates a neat finish without adding bulk.
For heavier materials like wool or linen, blind hems are often used. A blind hem involves folding over a small portion of the raw edge towards the wrong side of the fabric and securing it with nearly invisible stitches along its length. The result is an inconspicuous finish that blends seamlessly into your weaving project.
When hemming your weaving project, take care to select thread colors that complement your design rather than detract from it. Consider using matching threads for subtle finishes or contrasting threads for added visual interest.
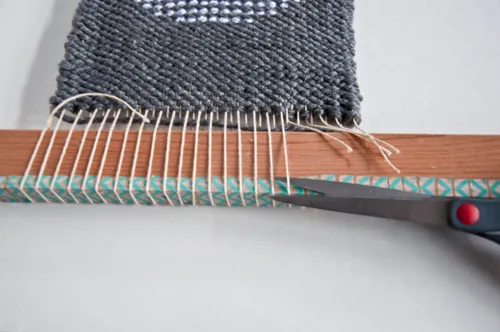
Adding Fringe to Your Weaving: A Step-by-Step Guide

Adding fringe can be an excellent way to enhance texture and movement in your weaving project while also protecting its edges from fraying over time. Here is a step-by-step guide on how to add fringe to your weaving:
1. Determine the desired length of your fringe and cut strands of yarn or thread accordingly. Make sure they are at least twice the desired length, as they will be folded in half during the attachment process.
2. Fold each strand of yarn or thread in half, creating a loop at one end.
3. Insert a crochet hook or tapestry needle through the edge of your fabric where you want to attach the fringe.
4. Hook the looped end of one strand onto the crochet hook or tapestry needle and pull it through, creating a small loop on the front side of your fabric.
5. Pass both ends of the strand through this loop and pull tight, securing it to your fabric.
6. Repeat steps 3-5 along the entire edge of your weaving project until all desired fringe strands are attached.
7. Trim any uneven ends to achieve an even and uniform appearance.
Adding fringe not only adds visual interest but also allows you to customize your weaving project further by selecting different colors or textures for added dimensionality.
Creating a Tassel: A Fun and Easy Finishing Touch
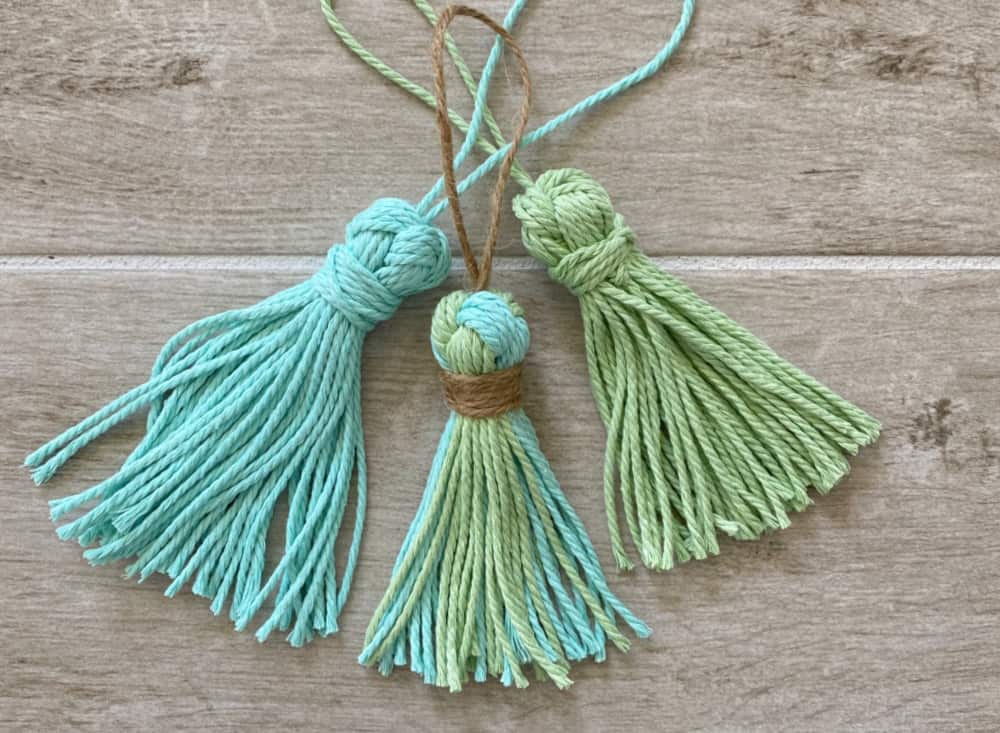
If you’re looking for a fun and easy way to finish off your weaving project, consider adding tassels! Tassels can be created using various materials such as yarn, embroidery floss, or even ribbon, allowing you to personalize them according to your design aesthetic.
To create a tassel:
1. Cut several strands (around 10-15) of yarn or other material that is approximately twice as long as you want your finished tassel to be.
2. Fold these strands in half so that they form a loop at one end.
3. Take another piece of yarn (about 6 inches long) and tie it tightly around all folded strands near their top.
4. Trim any uneven ends so that all strands are the same length.
5. Attach the tassel to your weaving project by threading the loose ends of the tying yarn through a tapestry needle and inserting it into your fabric where you want the tassel to be. Secure it by knotting or stitching.
Tassels can be added to corners, edges, or even as decorative elements within your weaving project. They add a playful touch and can help tie together different colors or textures used in your design.
Embellishing Your Weaving with Beads or Embroidery

Embellishing your weaving with beads or embroidery is an excellent way to add intricate details and personal touches to your finished piece. Whether you choose to incorporate beads into specific patterns or use embroidery stitches for additional texture, these techniques can elevate your weaving from ordinary to extraordinary.
When adding beads, consider using a thin needle that will easily pass through the weave structure without causing damage. Thread each bead onto the needle before carefully inserting it into specific areas of your fabric according to your desired design. Secure each bead by passing the needle back through adjacent threads on the wrong side of your fabric.
Embroidery stitches can also be used creatively on woven projects. Consider using simple stitches such as running stitch, backstitch, or satin stitch for outlining shapes or creating patterns within larger areas of solid color.
When embellishing with beads or embroidery, remember not to overcrowd your design; less is often more when it comes to these intricate details. Take time experimenting with different placement options before committing fully.
Finishing Your Weaving with a Lining: Pros and Cons

Adding a lining is an option worth considering when finishing certain types of woven projects such as scarves, shawls, or bags. A lining provides several benefits but also has some drawbacks that should be taken into account before making a decision.
The primary advantage of adding a lining is increased durability and protection for your weaving. A lining can help prevent wear and tear, especially if your project will be subjected to frequent use or handling. It also adds an extra layer of insulation, making it ideal for items like scarves or blankets.
Additionally, a lining can hide any imperfections on the wrong side of your fabric, ensuring that the finished piece looks polished from all angles. It also allows you to experiment with different colors or patterns that complement your weaving design.
However, there are some drawbacks to consider when deciding whether to add a lining. Firstly, it adds additional time and effort to the finishing process as you need to cut and sew another piece of fabric. Secondly, a lining may affect the drape or texture of your weaving project depending on its weight and stiffness.
Ultimately, the decision to add a lining should be based on factors such as intended use, personal preference, and desired aesthetic outcome.
Storing and Caring for Your Finished Weaving
Once you have completed all the finishing touches on your weaving project, it is essential to store and care for it properly so that it remains in pristine condition for years to come.
To store your finished weaving:
1. Clean it thoroughly by gently brushing off any dust or debris using a soft brush.
2. Roll up your fabric loosely with acid-free tissue paper in between each layer.
3. Place the rolled-up fabric in a clean cotton bag or wrap it in acid-free tissue paper before storing it in a cool and dry place away from direct sunlight.
Avoid folding your woven piece as this can cause permanent creases over time. If folding is necessary due to limited storage space or transportation needs, make sure you fold along existing lines within the weave structure rather than creating new ones.
To care for your finished weaving:
1. Avoid exposing it directly to sunlight as this can cause fading over time.
2. Keep away from excessive moisture or humidity which can lead to mold or mildew growth.
3. If necessary, spot clean using a mild detergent and cold water. Gently blot the affected area without rubbing or scrubbing.
Regularly inspect your weaving for any signs of damage or wear and address them promptly to prevent further deterioration. By following these storage and care tips, you can ensure that your finished weaving remains in excellent condition for years to come.
Conclusion: Celebrating Your Finished Weaving and Moving Forward
Finishing your weaving loom is not just about completing a project; it is about taking pride in your work, celebrating the effort you have put into creating something beautiful, and moving forward with new creative endeavors.
Once you have completed all the finishing touches on your weaving project, take a moment to admire it from different angles. Appreciate the intricate patterns, textures, and colors that make it unique. Share it with others who can appreciate the artistry involved in handwoven creations.
As you celebrate your finished weaving project, reflect on what you have learned throughout the process. Consider how each step of finishing has contributed to its overall appearance and durability. Take note of any techniques or materials that worked particularly well for future reference.
Finally, use this experience as inspiration to embark on new weaving projects with renewed enthusiasm. Apply what you have learned from finishing this piece to future creations while also exploring new techniques or designs that challenge and expand your skills as a weaver.
Remember that every finished weaving represents not only hours of labor but also an expression of creativity and passion. Embrace each completed project as an opportunity for growth while cherishing the joy it brings both during its creation process and long after its completion.
Each finished weaving is a testament to the weaver’s dedication and skill. It is a tangible manifestation of their artistic vision and the culmination of countless hours spent honing their craft. As such, it should be celebrated and cherished as a work of art. Each completed project offers an opportunity for growth, as the weaver can reflect on their techniques, color choices, and design elements to improve future creations.
Moreover, the joy that comes from creating a weaving extends far beyond its completion. It is a source of pride and satisfaction that can be revisited and admired for years to come. So, let us remember to embrace each finished weaving with gratitude and appreciation, recognizing the beauty and significance it holds.
FAQs
What is weaving?
Weaving is the process of interlacing two sets of yarn or threads at right angles to create a fabric or cloth.
What is a weaving loom?
A weaving loom is a device used to weave cloth and tapestry. It holds the warp threads under tension and facilitates the interweaving of the weft threads.
What is the final stretch in weaving?
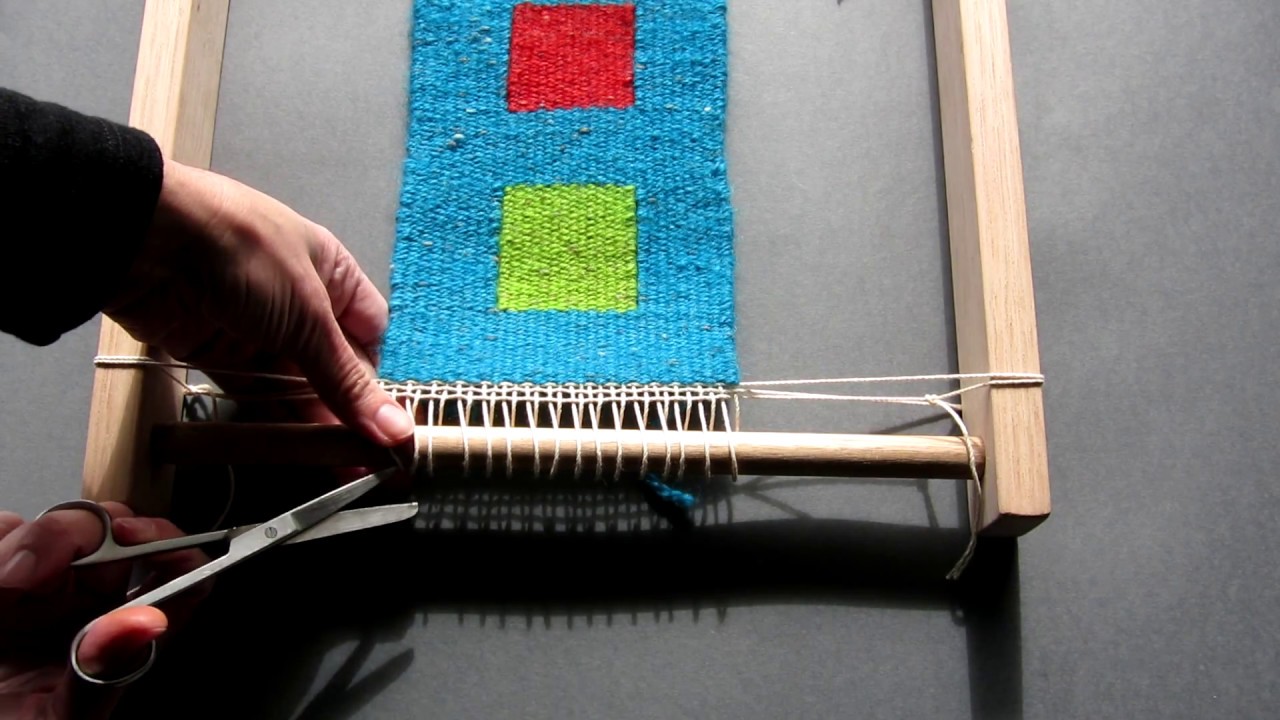
The final stretch in weaving refers to the last steps taken to finish a weaving project. This includes removing the finished cloth from the loom, cutting and securing the warp threads, and finishing the edges of the cloth.
Why is it important to finish a weaving loom properly?
Finishing a weaving loom properly ensures that the cloth is secure and will not unravel or come apart. It also gives the cloth a professional and polished look.
What are some tips for finishing a weaving loom like a pro?
Some tips for finishing a weaving loom like a pro include cutting the warp threads evenly, securing the ends with knots or fringe, and finishing the edges with hemming or binding. It is also important to wash and block the finished cloth to set the weave and remove any sizing or residue.
Originally posted 2024-01-15 03:55:02.